This blog post goes over every single social media scheduling tool, and is updated regularly to provide updated information. Some of the social media schedulers are free, some are paid.
Last updated: March 30, 2022
This list only covers scheduling tools that support multiple social networks. Scheduling tools that only support a single social network, such as Tweetdeck, have not been included.
Here is a sortable spreadsheet of every single social media scheduling tool, their starting price, and whether they offer a free-forever plan:
Click “View larger version” to expand the full spreadsheet ☝️
If you scroll down, you will find this list again in blog post form, with a screenshot and pricing info on every one of these social media schedulers 👇
Social networks supported by this social media scheduling tool: Facebook (Profiles, Pages, and Groups), Instagram (direct posting), Twitter, Pinterest, LinkedIn, Google My Business, TikTok, and Stocktwits.
Starting price: $18/month, 3 social accounts
Free-forever plan: Yes, limited to 2 social accounts and 6 scheduled posts.
Features
Posting to multiple accounts – OneUp makes it easy to post to Instagram (with direct posting), Facebook (Profiles, Pages, and Groups), LinkedIn (Profiles and Pages), TikTok, Twitter, Pinterest, and Google My Business all at once.
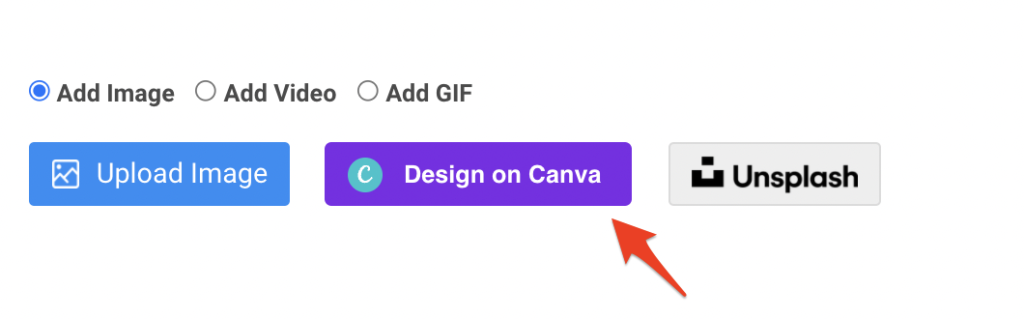
You can customize the post for each social network, add multiple images to each post, and directly import free, high-quality images with our Unsplash integration.
Schedule Instagram Stories – Schedule Instagram Stories with OneUp, and receive notifications on your phone when it’s time to publish them.
Canva integration – OneUp directly integrates with Canva. Just click the “Design on Canva” button in the scheduler, and Canva will open directly inside of OneUp.
Click the “Publish” button in the Canva editor, and your image will be uploaded to OneUp directly. No need to download images from Canva, then upload to OneUp 🙂
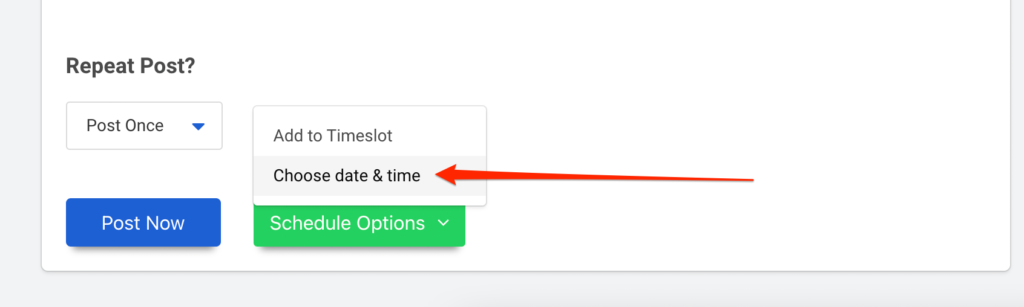
Repeating post – OneUp gives you the option to automatically repeat your posts at whatever interval you choose, such as every 3 weeks, or even “the first Monday of each month”. Then post it now, schedule it for the future, or save the post in your Drafts folder.
Posting to Google My Business – OneUp is one of the few social media scheduling tools that supports Google My Business post scheduling. OneUp supports Call-To-Action buttons, and different post types such as Event posts.
You can even choose for your post’s image to be added to the Photos section of Google My Business as well.
Auto-posting from RSS feeds – You can connect an RSS feed to OneUp, and have posts automatically published whenever there is something new in the feed. Or, you can choose to have each new item from the feed go to your Drafts folder, so you can review which posts you want to publish.
Bulk uploading posts – OneUp supports bulk uploading posts from a CSV, directly from your computer, or via OneUp’s Chrome extension.
Customizable UTM parameters – OneUp lets you customize UTM parameters so you can keep track of how your links are performing in Google Analytics.
Link Shortening – Connect your Bitly account and OneUp will automatically shorten any links and allow you to track clicks through Bitly.
Schedule Twitter Threads – Not many scheduling tools allow you to schedule Twitter threads (AKA tweetstorms), however you can do so with OneUp, and even add images, GIFs, and videos on each tweet in your thread.
And one last thing: OneUp has received over 260 positive reviews on Capterra 😊
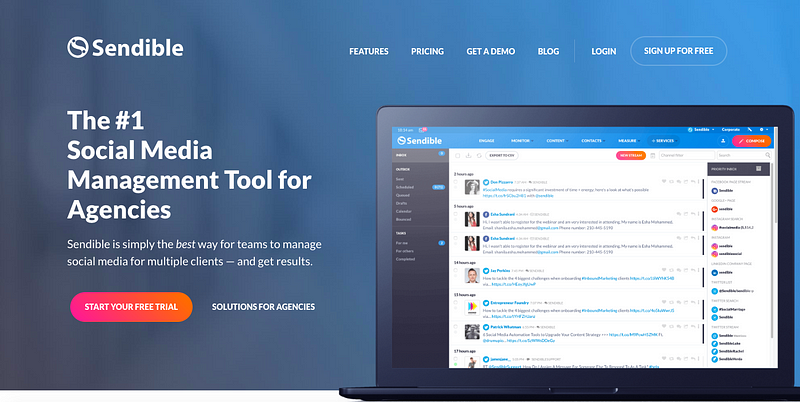
Social networks: Facebook, Twitter, Instagram, LinkedIn
Starting price: Undisclosed.
Free-forever plan: No.
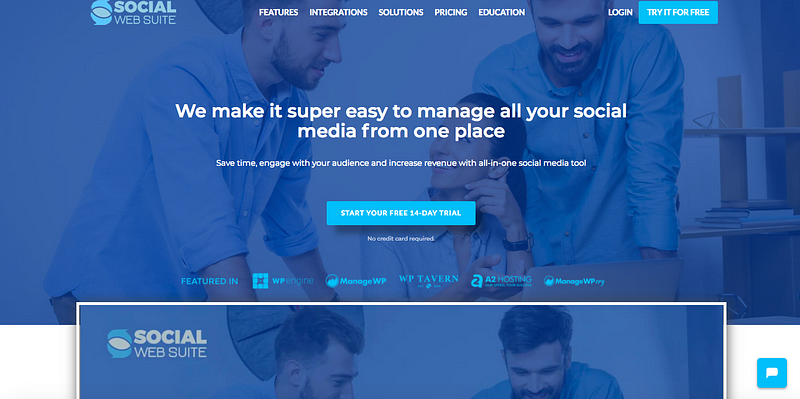
Social media management tools make it easy to manage all your social accounts. Social media marketing is helpful for managing multiple social accounts, publishing content, and can help you schedule tweets, schedule Facebook posts, schedule Instagram posts, schedule LinkedIn posts, schedule Twitter posts, schedule Pinterest posts, schedule Google My Business posts, and even schedule Reddit posts. Marketing teams and content creators will find social media management tools helpful for real-time social media content marketing.
Did I miss any social media schedulingtools? Let me know in the comments and I will add them 😁
Scroll down for a free Pinterest Pin scheduling tool.
To schedule your Pins for the future on Pinterest, you have 2 options:
Use the scheduler on Pinterest, or
Use a 3rd-party Pinterest scheduling tool
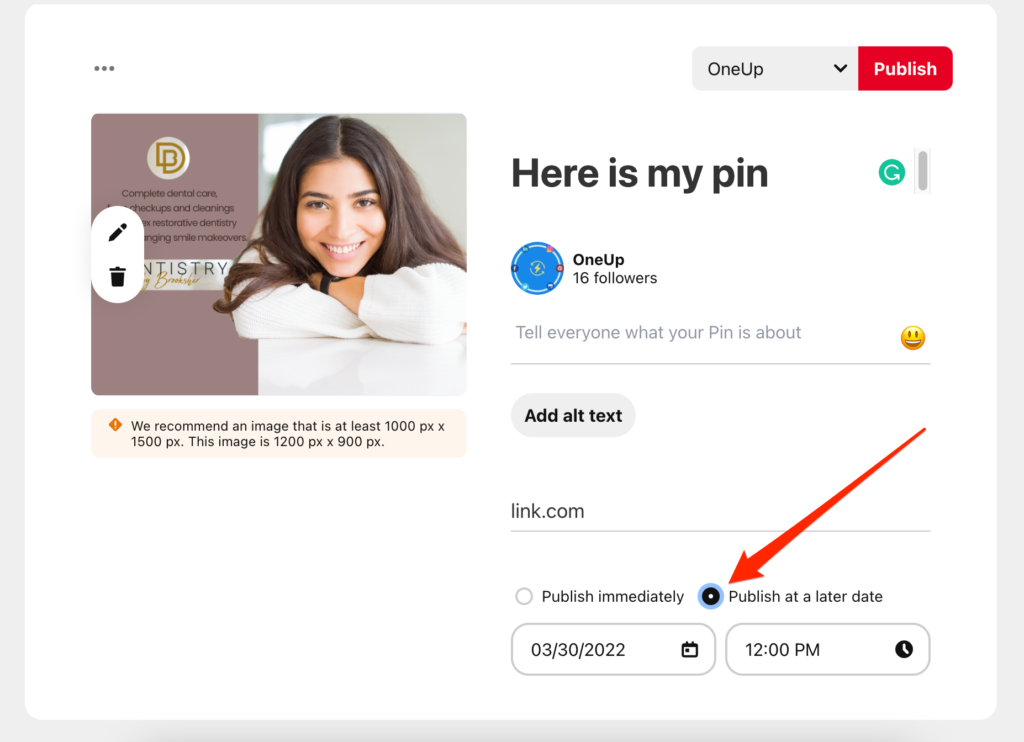
If you use the scheduler on Pinterest, you can choose the “Publish at a later date” option while creating your post:
However, when you try to choose the date you want your Pin published, it only lets you schedule up to 2 weeks into the future. Everything after 2 weeks is grayed out:
If you want to schedule Pins as far into the future as you’d like, you can schedule Pins to Pinterest for free using a 3rd-party Pinterest scheduling tool like OneUp.
Here is how OneUp works 👇
How to schedule Pinterest posts for free
Connect your Pinterest account(s) to OneUp (it’s free, and both business and personal Pinterest accounts are supported)
Click “Create a post”
Select your Pinterest account(s) and which Board you want to post to
Type in your Pinterest post, add your Pin Title, destination link, and image
Choose whether you want it to post once or repeat, then schedule your post
Here are those steps with images:
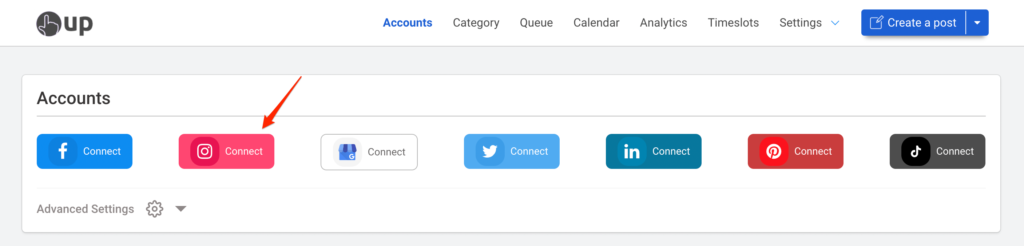
First, connect your Pinterest account from the Accounts page in OneUp:
OneUp supports both business and personal Pinterest accounts.
Then click the “Create a post” button in the top right corner.
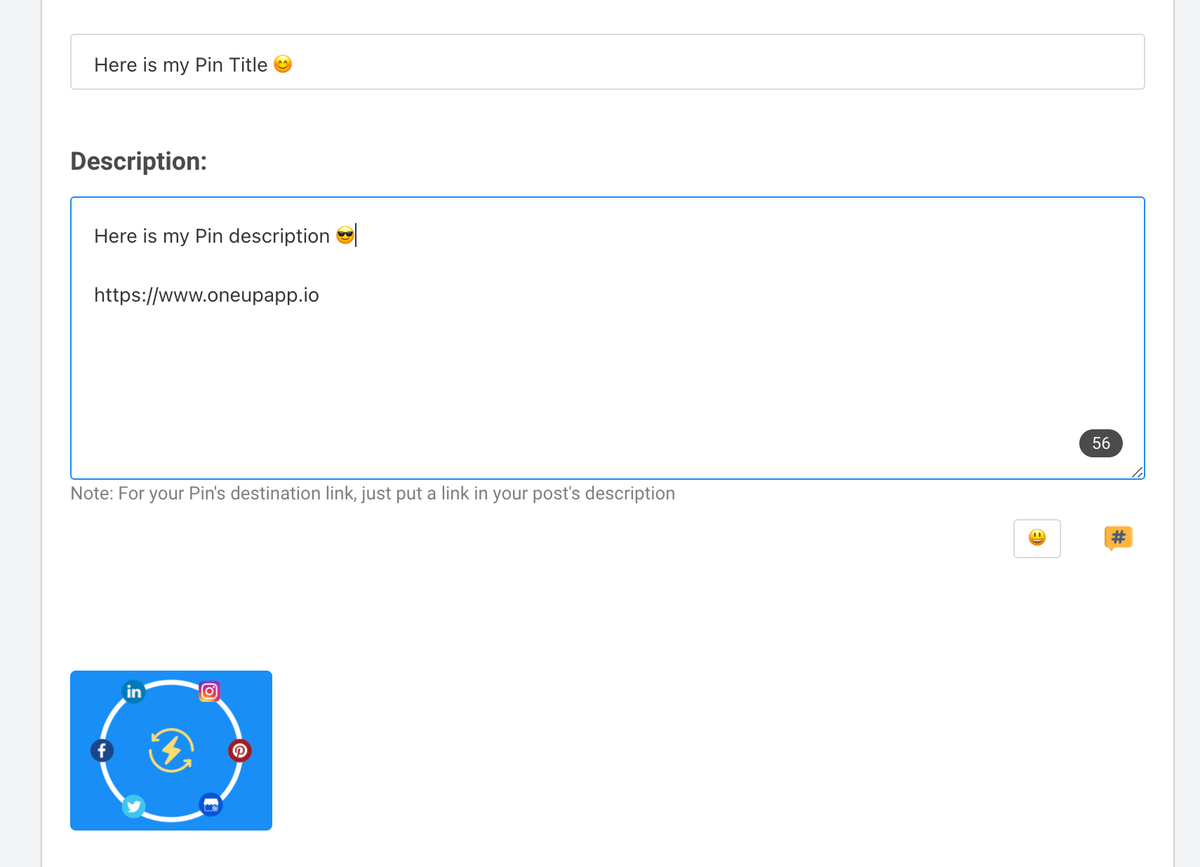
Just like when you create Pins on Pinterest itself, OneUp allows you to add Pin titles, descriptions, and destination links for your Pins:
OneUp even has a Canva integration, so you can create a Canva image and add it to your post without ever leaving OneUp.
Then choose for it to either post once or automatically repeat at whatever interval you want, and then schedule your Pin:
You can schedule your Pinterest Pins as far into the future as you want. You are not limited to the 2-week window like when using Pinterest’s native scheduler.
In addition to Pinterest, OneUp also supports Instagram, Facebook, Twitter, LinkedIn, TikTok, and Google My Business.
Pinterest currently boasts 431 million daily active users. This is slightly down from the peak at the height of the pandemic, but it is still solid year-over-year growth for Pinterest.
If you are selling anything visual, having a presence on Pinterest is a must.
According to Pinterest, 60% of Pinterest users are women and 40% are men. So Pinterest is not just for people whose target audience is women.
Also, 45% of people in the US with a household income over $100K are on Pinterest, so if you sell high-priced items, Pinterest may be a good channel for you.
Pin vs Idea Pin
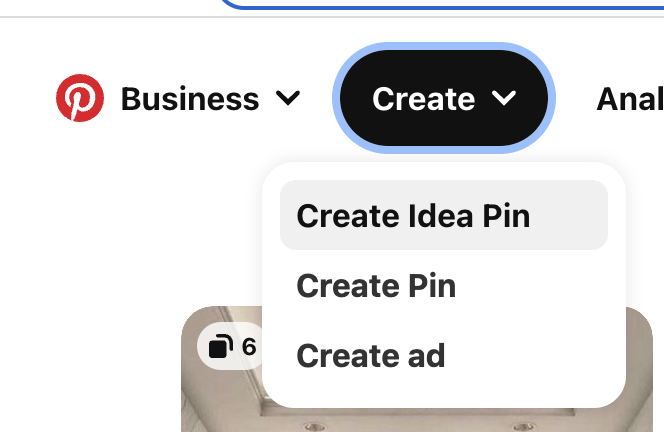
While on Pinterest, you may have noticed the option to create an Idea Pin.
Cool. What’s an “Idea Pin”?
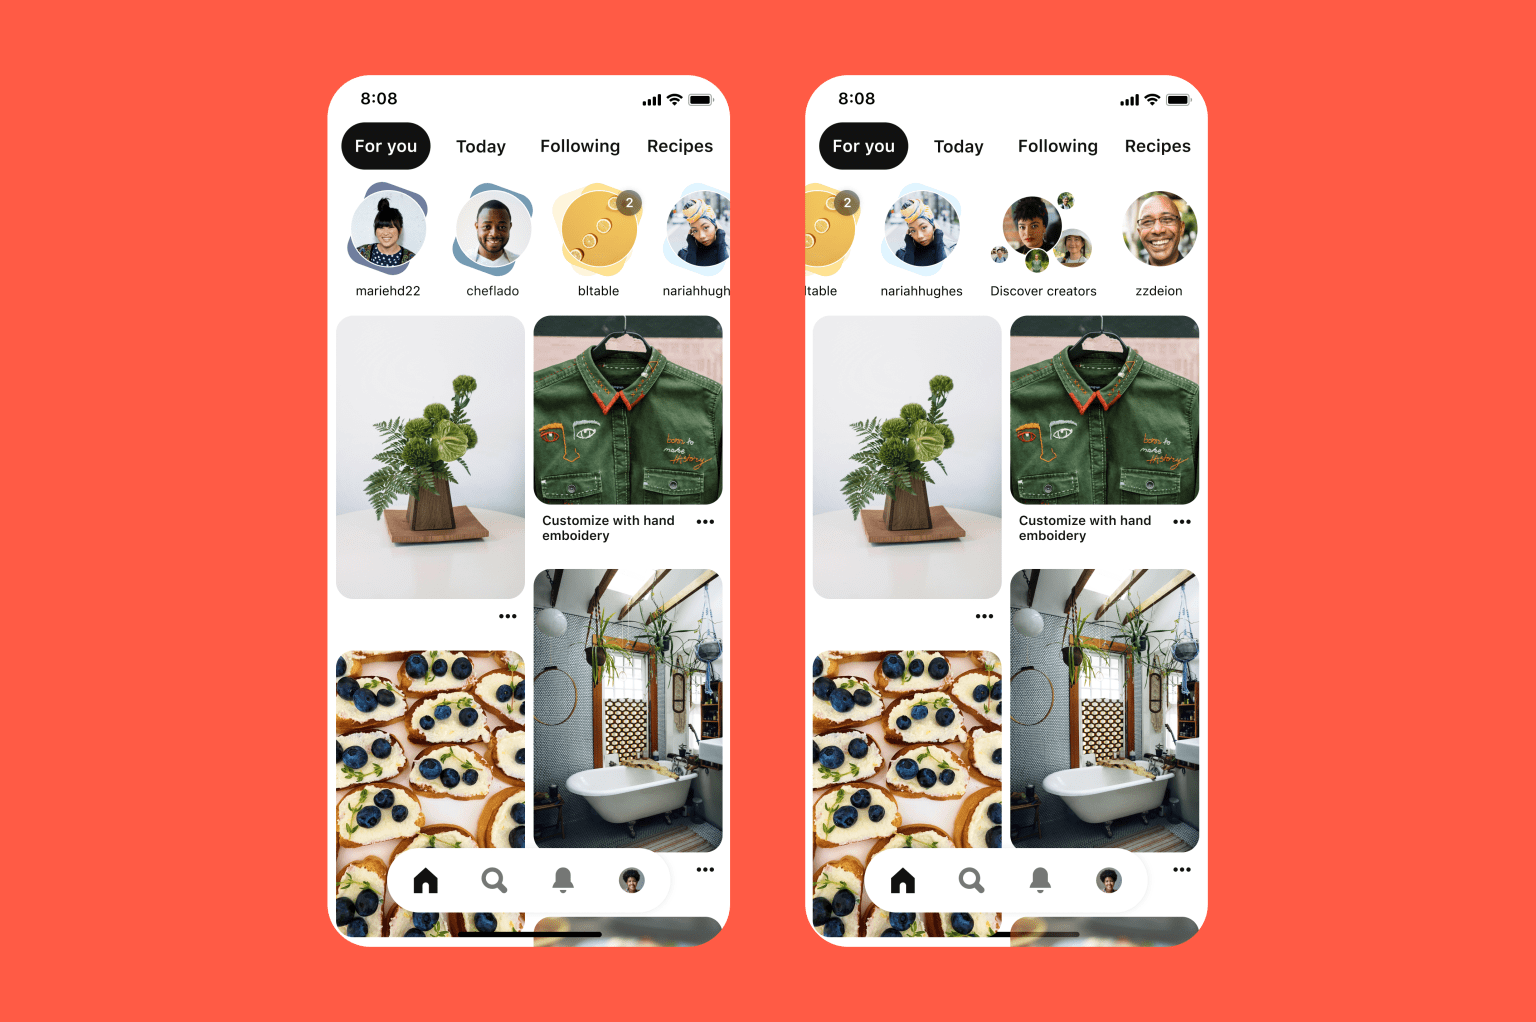
An Idea Pin is basically Pinterest’s version of Stories.
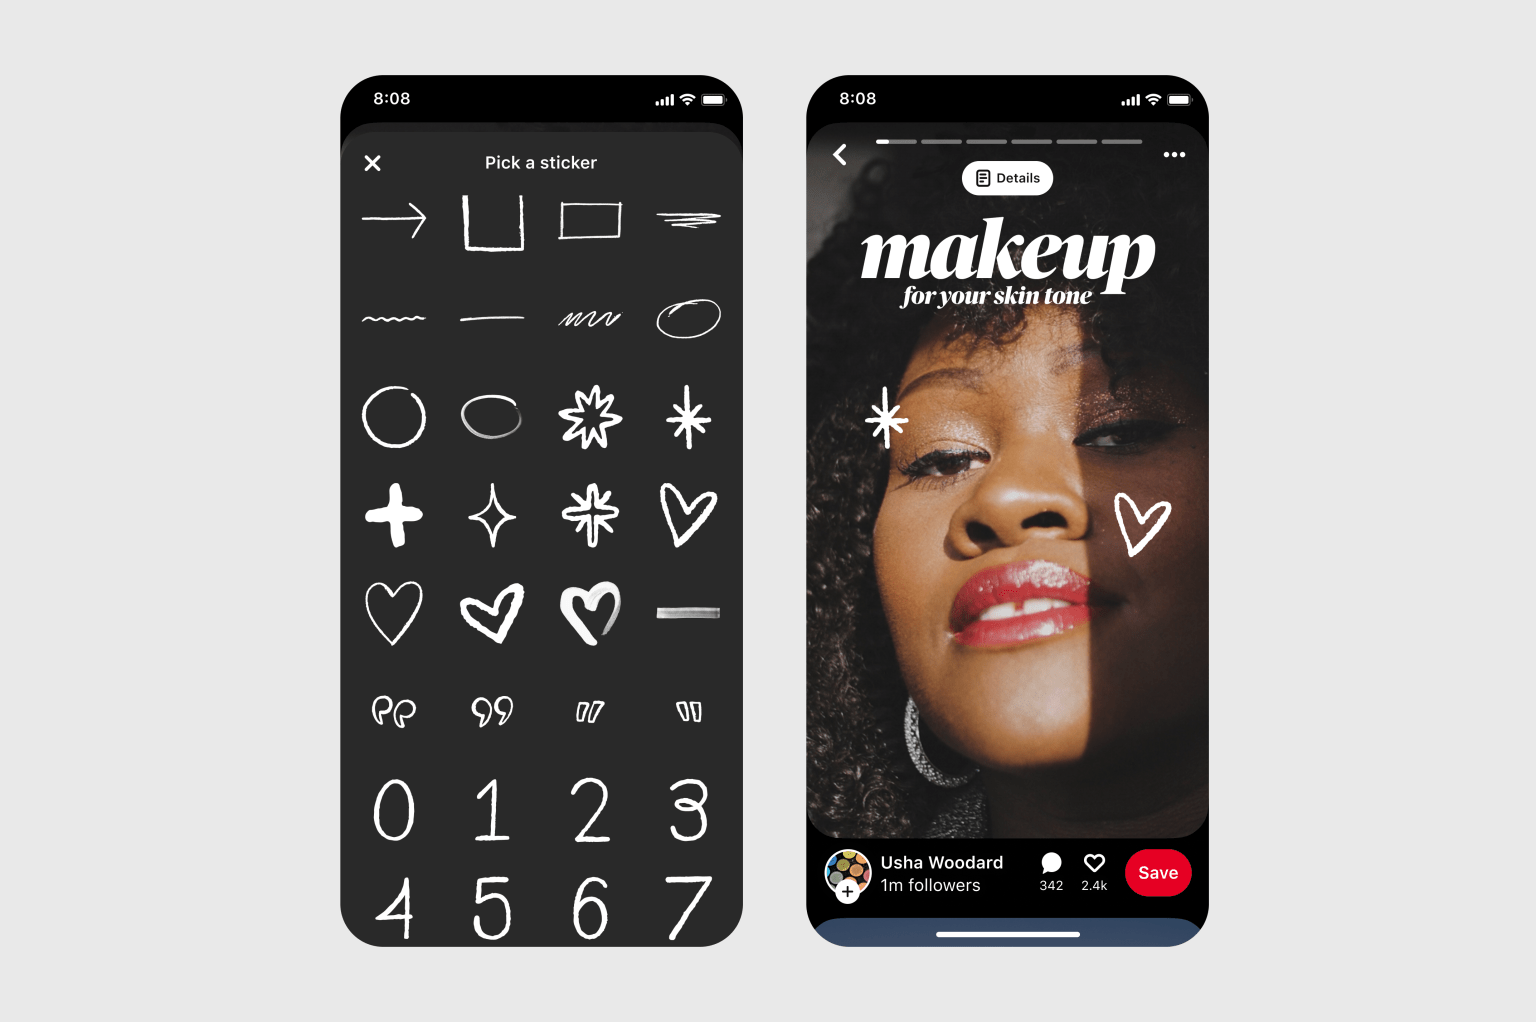
You can create an Idea Pin with up to 20 images and videos, using tools like voiceover recording, background music, transitions and other interactive elements, and they will play as consecutive slides in your Idea Pin.
Just like regular Pins, you can add a Title and choose a Board for your Idea Pins:
Pinterest has found that Idea Pins were more engaging than standard Pins, with 9x the average comment rate. The number of Idea Pins (previously known as Story Pins) has also grown by 4x since January, as more creators adopted the format.
This makes sense given the prominent placement Idea Pins get.
Can you schedule Idea Pins for the future?
Unfortunately Idea Pins cannot be scheduled on Pinterest, and they also cannot be scheduled using a Pinterest scheduling tool like OneUp.
Schedule your Instagram Reel for a date and time in the future
Here are those steps with screenshots:
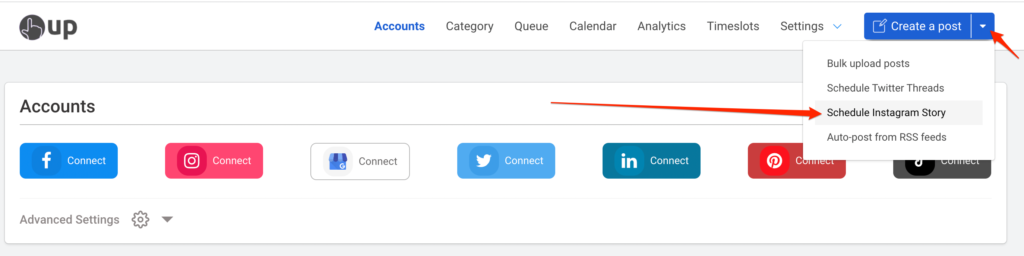
On the Accounts page of OneUp, connect your Instagram account
2. Click “Schedule Instagram Story”
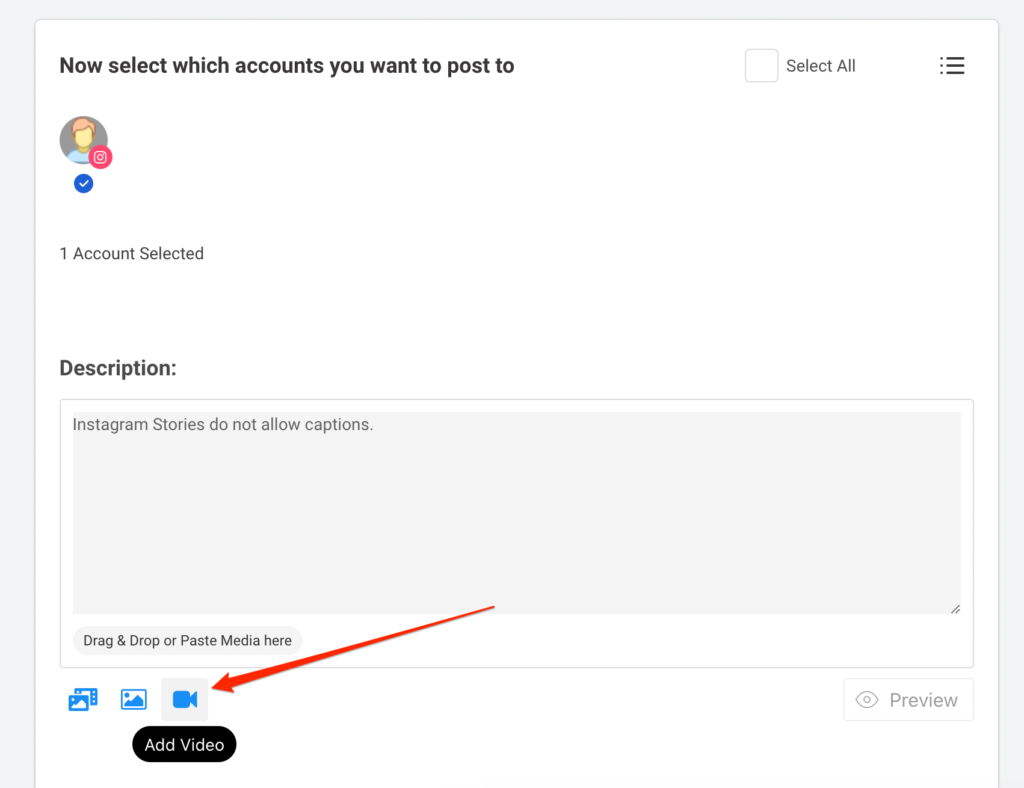
3. Upload your video
4. Then schedule your Instagram Reel
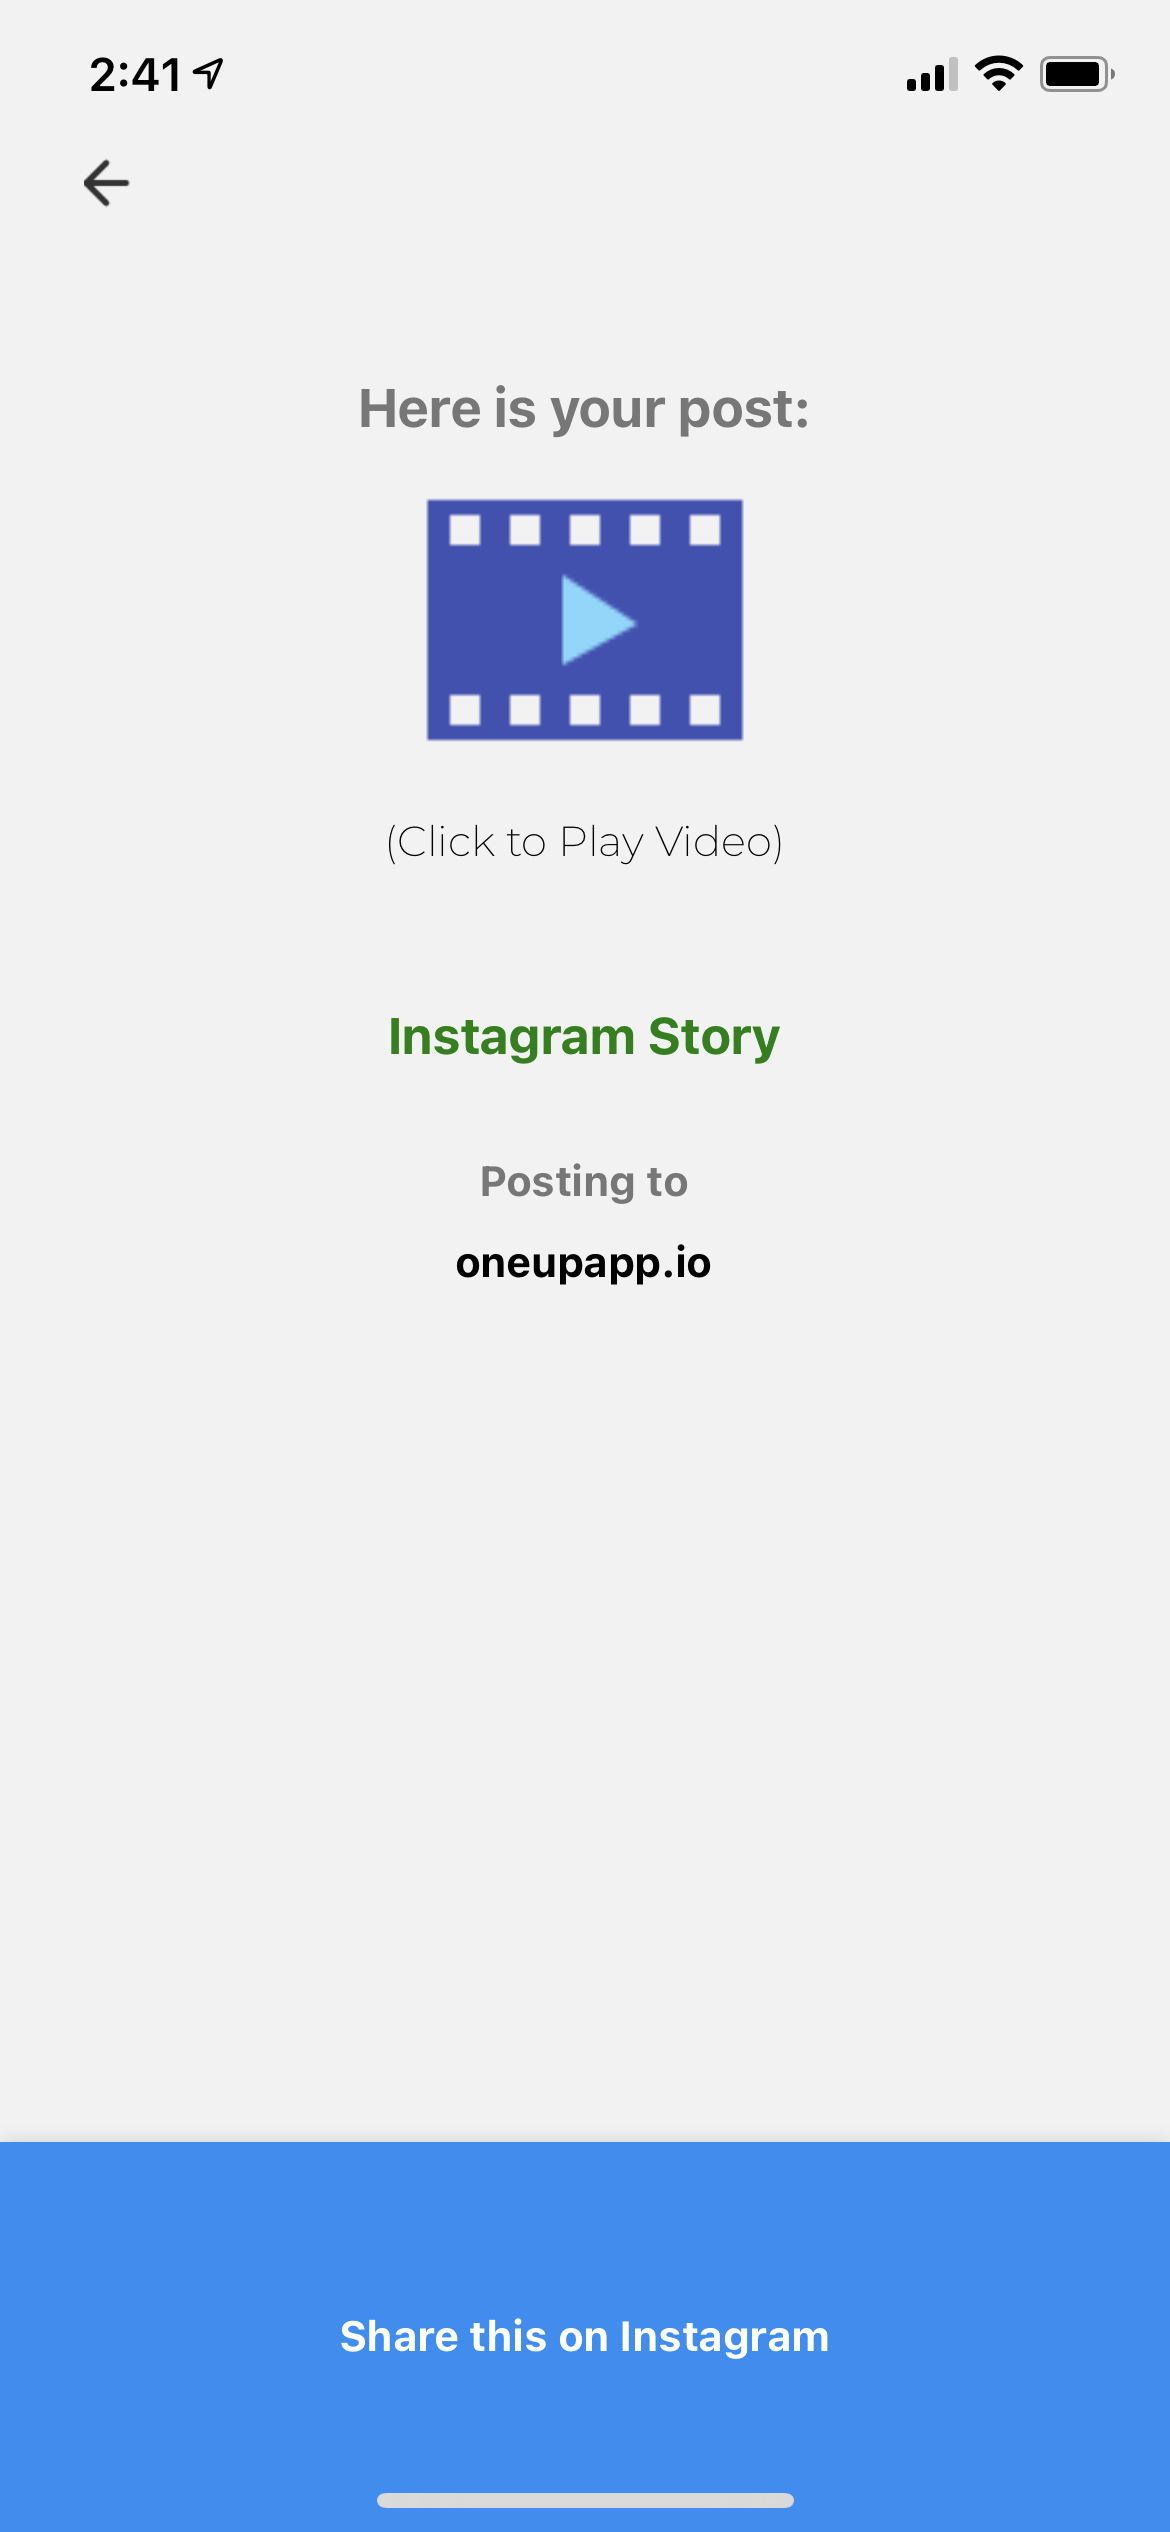
When the scheduled time comes, you will receive a notification on your phone about your Instagram Reel being ready. Tap that notification, and your Reel will open in the OneUp mobile app:
Click “Share this on Instagram”
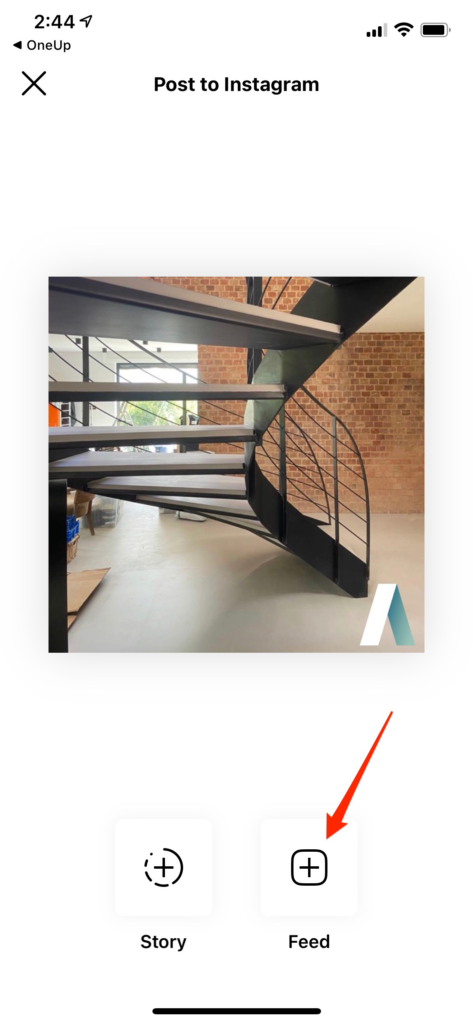
Then choose the “Feed” option:
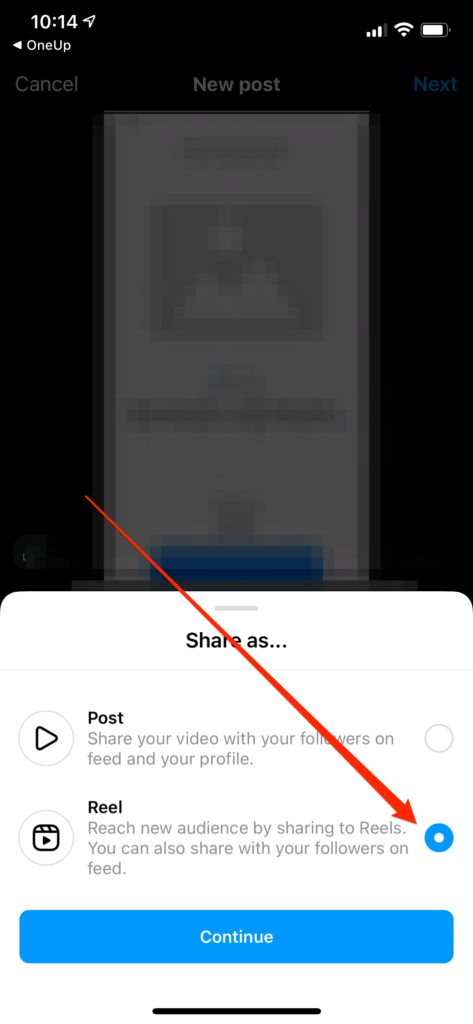
Once selected, you will see the option to post your video as a Reel:
This post goes over how to schedule posts on Stocktwits.
Stocktwits is a real-time social network for investors and traders. It is the largest social network for finance.
Many Stocktwits users would like to be able to schedule their posts for the future, rather than publishing all their posts in a short amount of time.
OneUp is a social media scheduling tool that supports Facebook, Instagram, Twitter, LinkedIn, Pinterest, Google My Business AND… Stocktwits.
How to schedule a post on Stocktwits
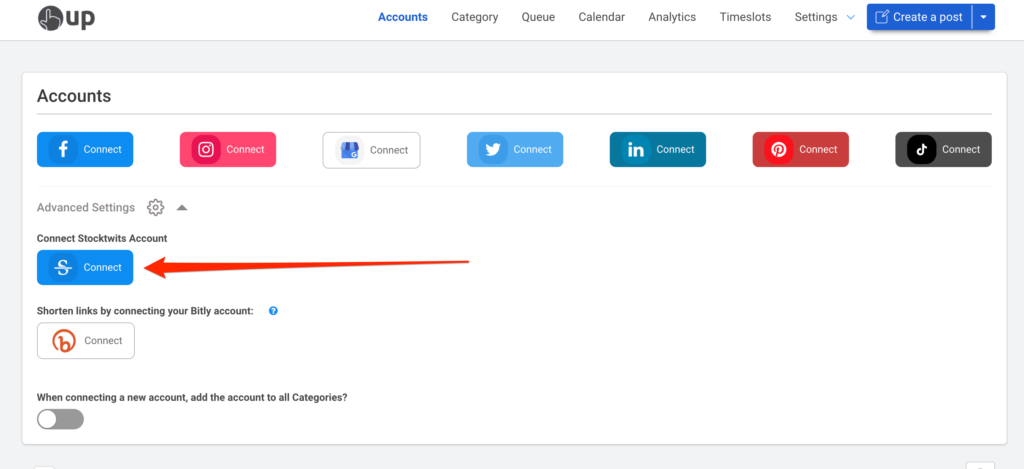
On the Accounts page of OneUp, you can connect your Stocktwits account (under Advanced Settings):
Then click “Create a post”:
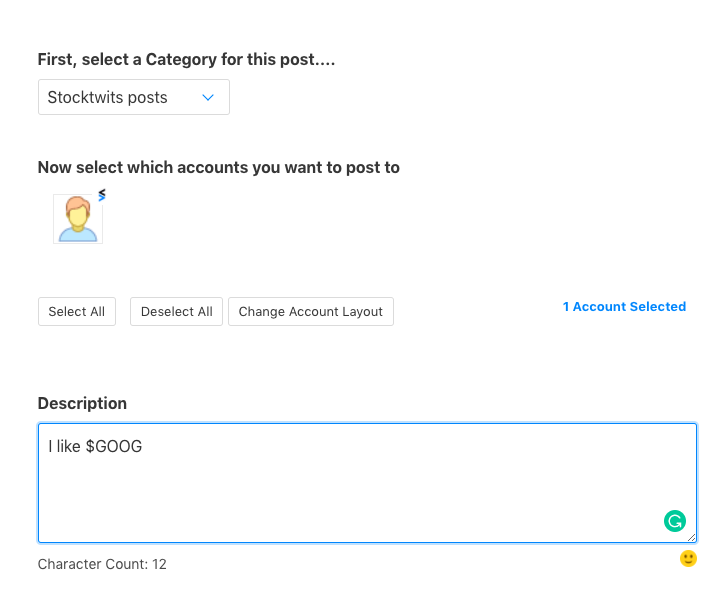
Select your Stocktwits account, then type in your post. Just like on Stocktwits, you can add cashtags to your post by adding a “$” followed by a ticker symbol.
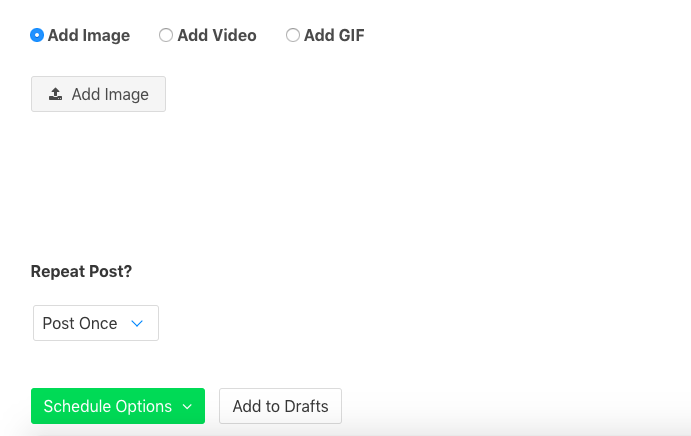
Then optionally add an image to your post, and choose whether you want it to publish once, or to automatically repeat.
After, you can either post it now, or schedule it for a date and time in the future.
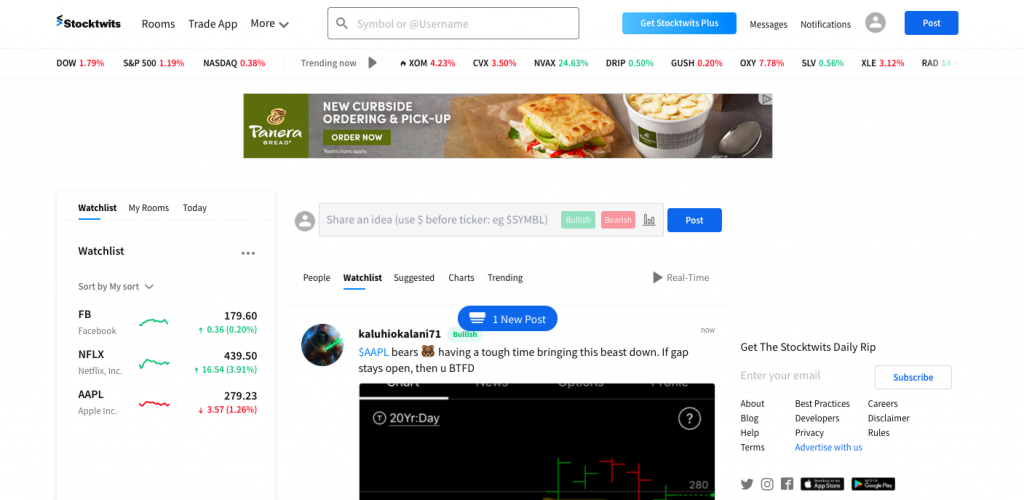
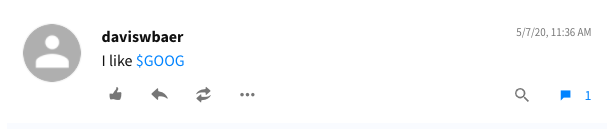
Here is how the post looks once it’s published on Stocktwits:
Check out OneUp to schedule your Stocktwits posts.
This blog post shows you how to turn off retweets from your timeline.
Twitter can be great. However, Twitter can be annoying when all you see is retweet after retweet in your timeline. You’re reading this because you just want to see original tweets, and not see any retweets in your timeline.
Here are the steps to do so:
How to mute retweets from your timeline on Twitter
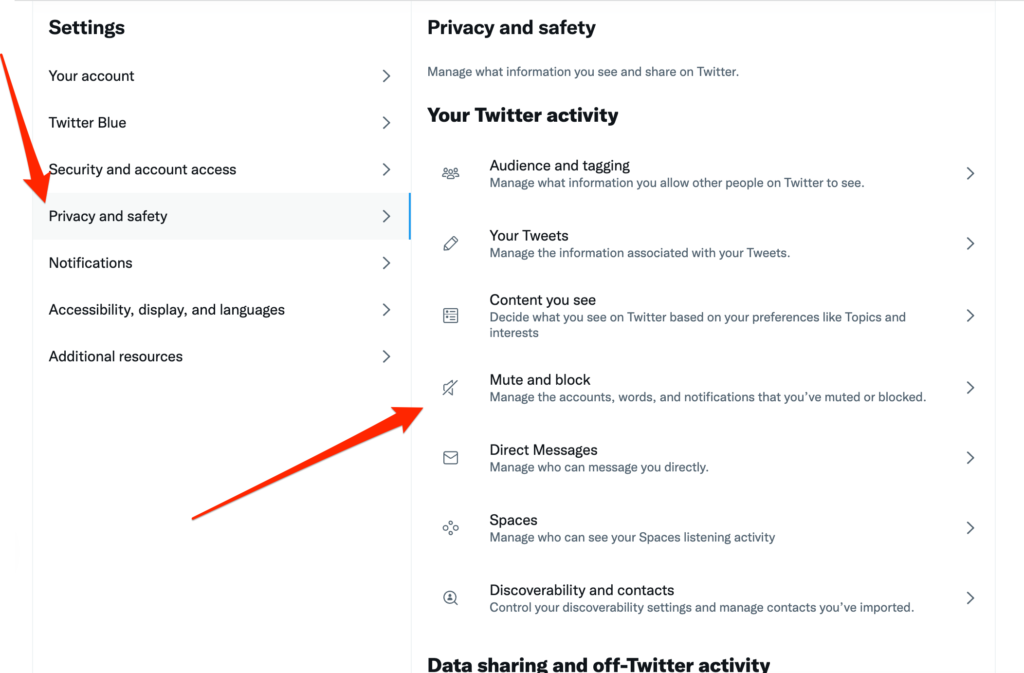
On Twitter, go to “Settings”, then “Privacy and safety”
Then click “Mute and block”
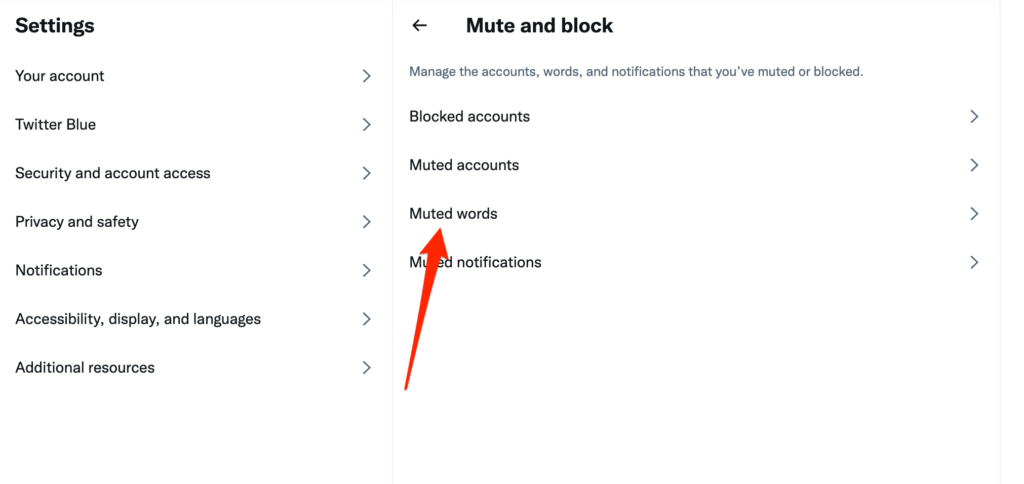
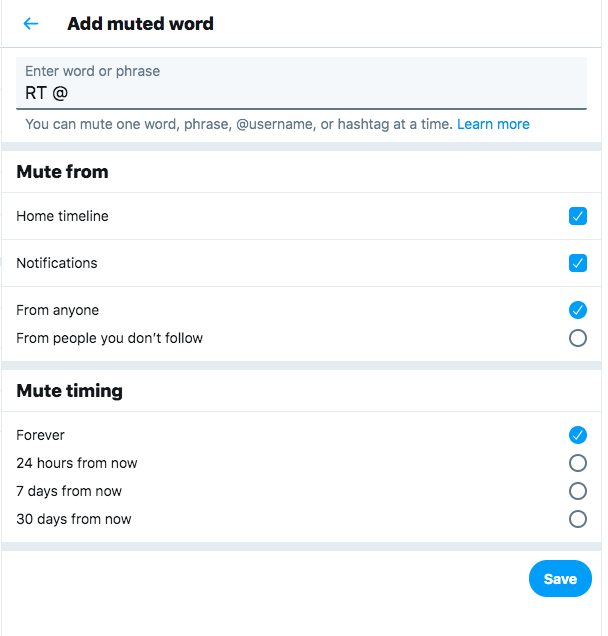
Click “Muted words”
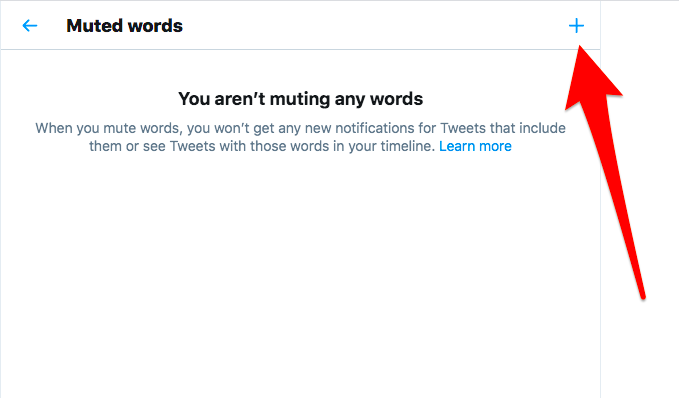
Click the “+” icon
Add “RT @” as the phrase
Click “Save”
Enjoy your Twitter timeline with no retweets clogging your feed
Here is how to mute retweets screenshot by screenshot
Click the “+” iconAdd “RT @” as the phrase, then click “Save”
Why does it work?
Behind the scenes, Twitter sees native retweets like original retweets. If you take a look at a native retweet through Twitter’s API, you will see that the full_text starts with “RT @username”. Because of this, we can filter them through with the “RT @” phrase.
Enjoy your Twitter timeline without all the retweets 😊
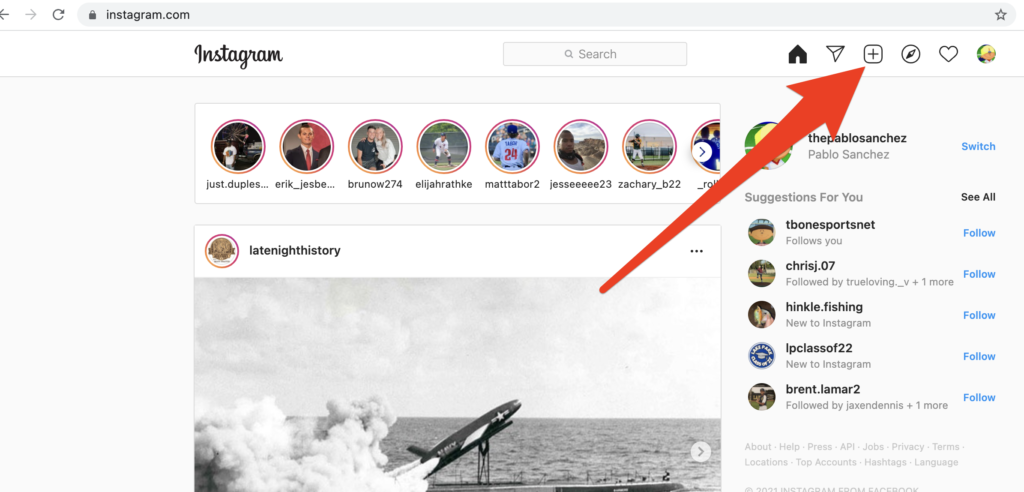
As of October 2022, you can now post to your Instagram account from a computer 🎉
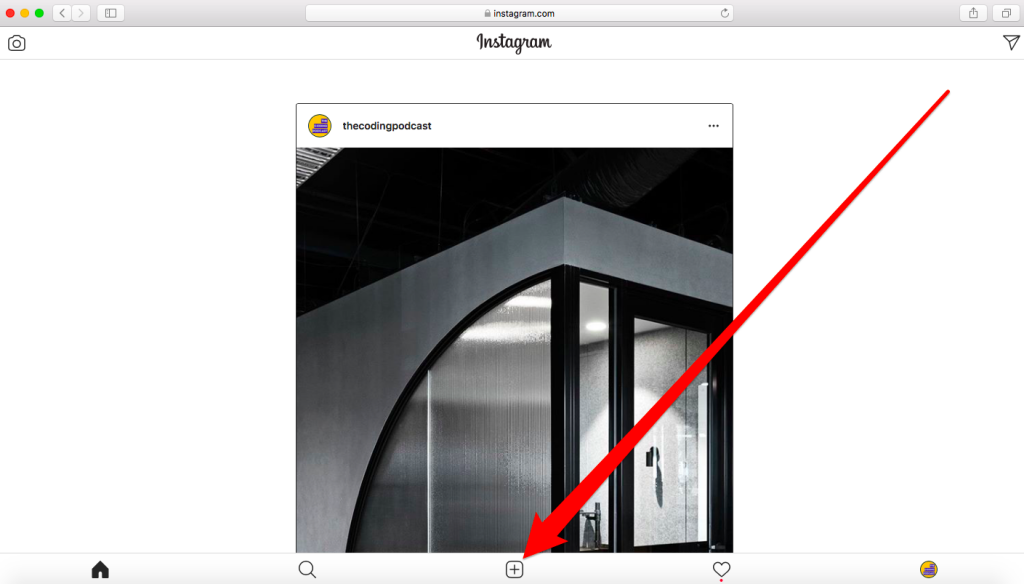
While on Instagram from an internet browser, you will now see the + option for adding a post:
Say goodbye to download images, sending it to your phone, and then posting from the Instagram app.
If you need a FREE way of scheduling Instagram posts for the future, scroll to the very bottom of this article 👇
Here was how to post to Instagram from a computer prior to October 2021:
This post shows you how to post on Instagram from a desktop computer, laptop, Mac, or PC for free in 2021.
Instagram does not let you post pictures directly to their website from a web browser on a desktop computer, laptop, Mac, or PC – but there is a way around it 🤓
Sure, you can email yourself photos, open up the email on your phone, save the photos, then post them on the Instagram app. However, that can get annoying quickly.
The solution: Most browsers have a way of letting you change the way a website shows to you. So even if you are on a laptop or desktop, you can have a website like Instagram show you the mobile version of the website, which will allow you to schedule Instagram posts from a computer – for free.
That is what we are going to do 😊
If you want to schedule Instagram posts for the future from a computer FOR FREE, scroll to the bottom of this article.
How to post to Instagram from a computer for free
Sign into Instagram
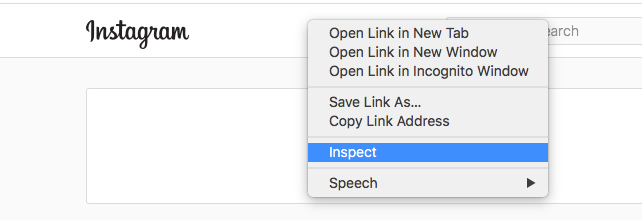
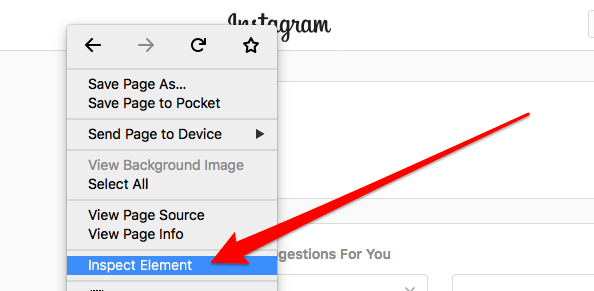
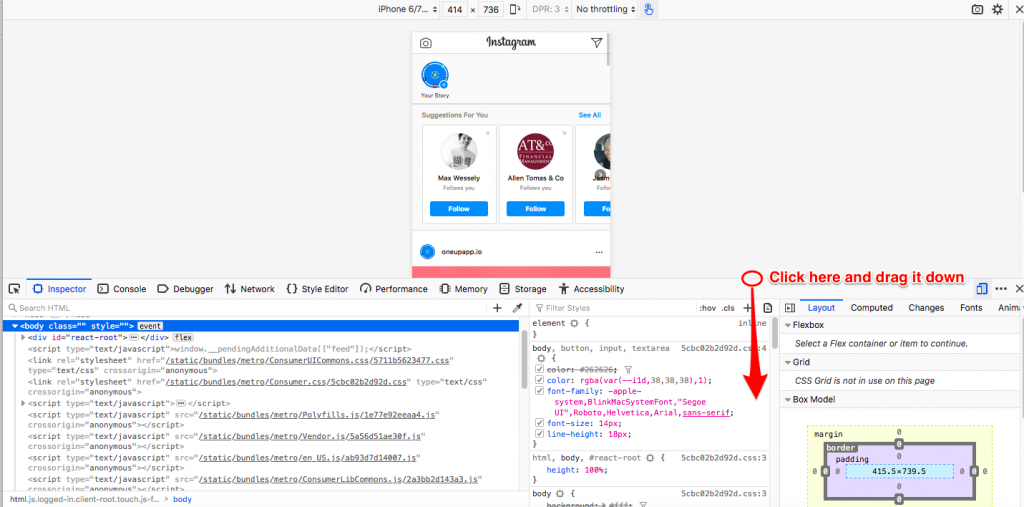
Right-click anywhere on the screen and click Inspect
Click the tablet/phone icon
Refresh the browser window
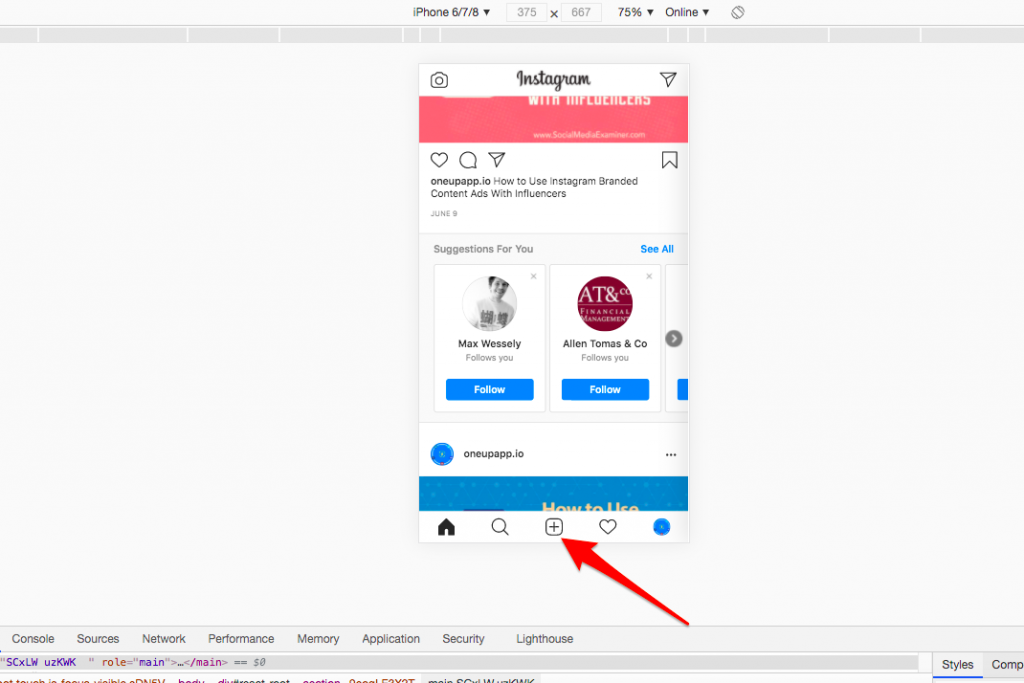
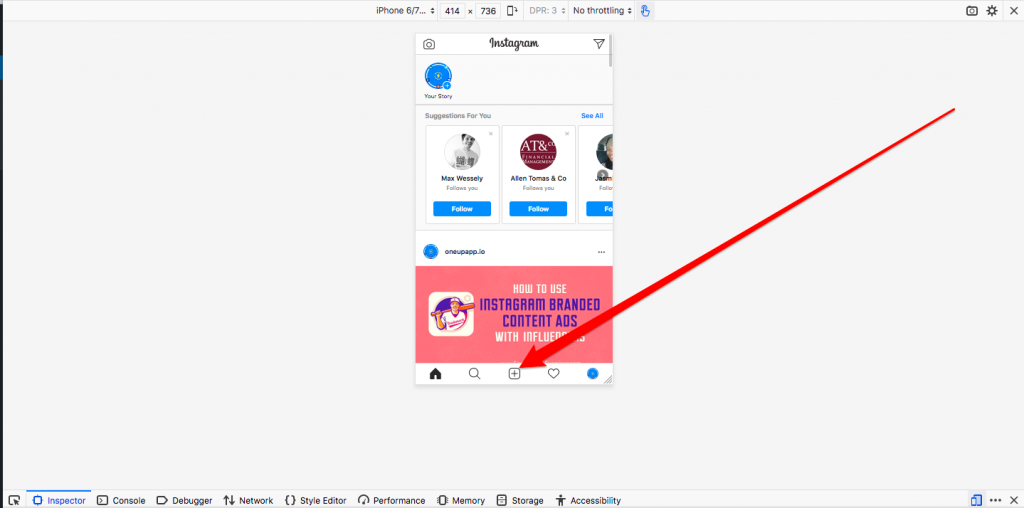
Click the “+” button to create your post
Post to Instagram from your computer
Here are those steps with screenshots:
How to post to Instagram from Google Chrome
To post to Instagram from a computer using Chrome, follow these steps:
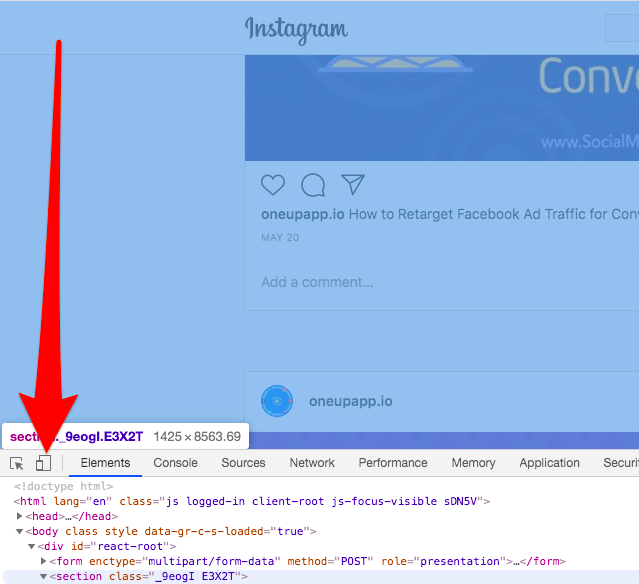
Using Google Chrome, go to Instagram.com and sign in. Next right-click anywhere on the page and select Inspect from the list.
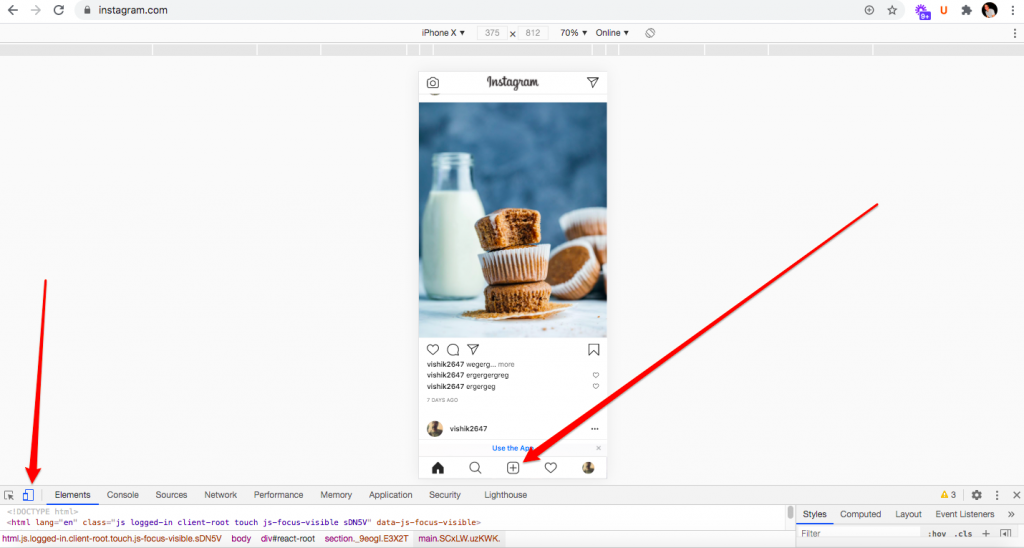
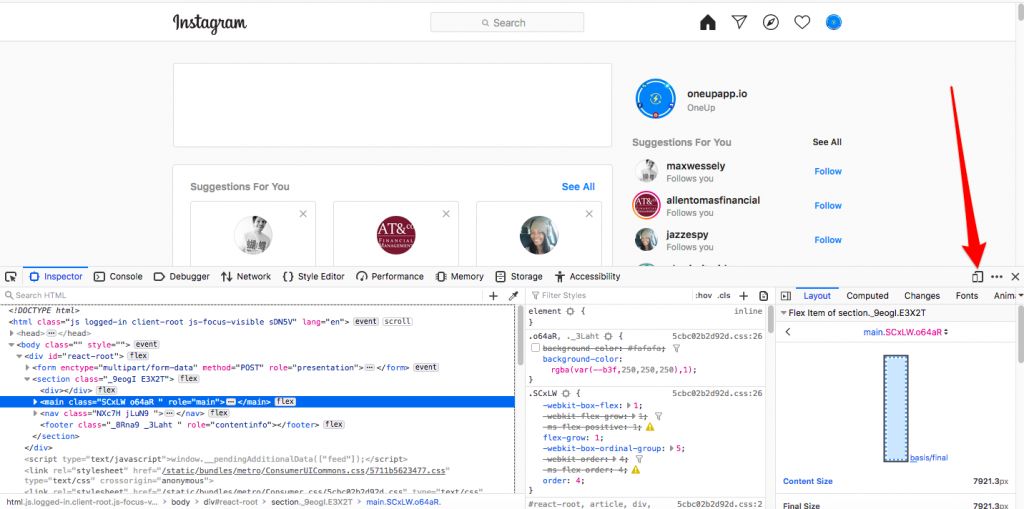
Part of the screen will be covered up with the Inspector tool, but we only care about the small icon of a tablet and phone, located in the top-left corner of the Inspector window. Click on it.
After, refresh the page (important step). Many people miss this step, so I will reiterate: You must refresh the Instagram tab in your browser!
Once refreshed, you should see the + icon to create a post on Instagram at the bottom of the window.
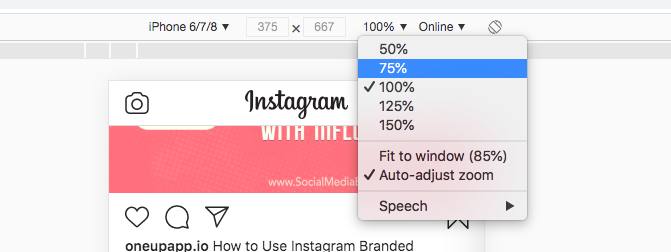
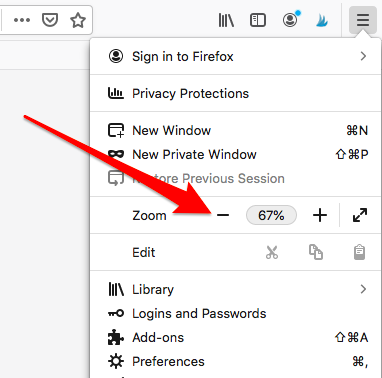
Tip: If you do not see the + icon, try zooming out from 100% to 75%.
Once you are finished, click on the tablet/phone icon again. Close the Inspector tool and refresh the website to go back to the normal version of the site.
How to post to Instagram from Safari
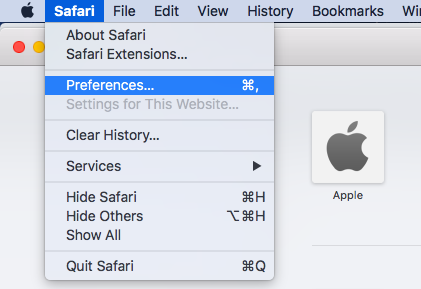
To post to Instagram from a computer using Safari, on the top menu of Safari, go to Safari > Preferences > Advanced. Select the box at the bottom that show Show Develop menu in menu bar.
Find the option to enable Develop options in Preferences under the Advanced tab.
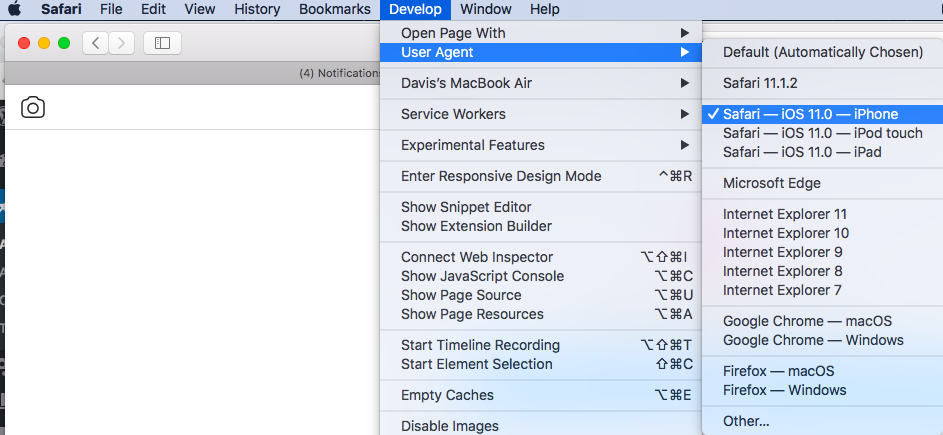
Next open a new Safari tab and click on Develop > User Agent > Safari — iOS — iPhone in the menu bar.
Next, go to Instagram.com and sign into your account. At the bottom of the screen will be a + icon — tap it and select a photo from your computer to upload. After the photo is uploaded, you can still apply filters and edit the photo as you would in the Instagram app.
When you’re done, make sure you change your user agent back to the Default setting to avoid viewing all websites in their mobile state.
How to post to Instagram from Firefox
To post to Instagram from your computer on a Firefox browser, first go to Instagram.com and sign in. Next right-click anywhere on the page and select Inspect Element from the list.
You will then see the Inspector tool popup.
Find the Phone/Tablet icon and click it.
Next, drag the Inspector tool to the bottom of your screen, so you can see more of the phone view of Instagram.
After, refresh the page (important step). Many people miss this step, so I will reiterate: You must refresh the Instagram tab in your browser!
You should now see the + icon to start creating your Instagram post.
Tip: If you do not see the + icon, you may need to go to your Firefox settings and zoom out a little bit.
How to schedule Instagram posts for free
The methods above show how to post on Instagram from a computer, however, it does not let you schedule Instagram posts for the future.
To schedule Instagram posts, you need a social media scheduling tool like OneUp.
And yes, OneUp has a Free Plan 😊
In OneUp, first connect your Instagram account:
In the Schedule Post dropdown, choose “Schedule a post”.
Choose which account you want to schedule this post to, and create your post:
Then choose to either post once or repeat this post, and either “Post Now” or schedule it for a future date and time.
Single image posts, multi-image posts (AKA carousel), video posts, and Instagram Stories are all supported with OneUp, on both Personal and Business Instagram accounts 😊
Facebook Groups are a great way to grow a community and find like-minded people. This post goes over how to create a Facebook Group.
How to create a Facebook Group
Go the Groups page in Facebook
Click “Create Group”
Name your Group
Add some people to your Group
Select Privacy
Choose whether Group is hidden or not
Click Create Group
Choose cover photo
Add a description
Edit Group settings
Add members
Create community and encourage engagement
Here is those steps with screenshots:
1. Go the Groups page in Facebook
2. Click “Create Group”
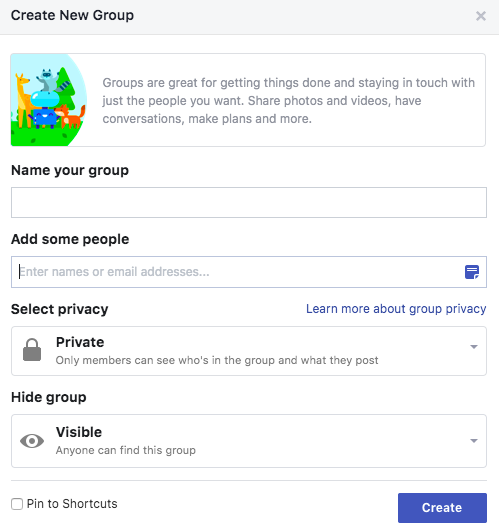
3. Name your Group
Make sure to name your Group something descriptive so people can find it via search.
4. Add some people to your Group
You can skip this step if you do not want to add people right now.
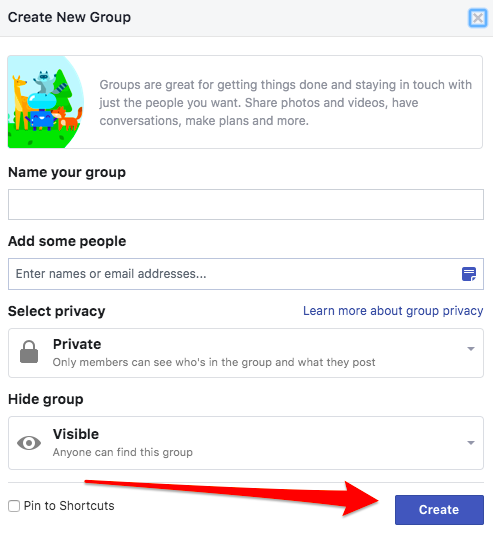
5. Select Privacy
You can choose for your Group to be either Public or Private.
For Public Groups, anyone can see who’s in the Group and what they post. For Private Groups, only member can see who’s in the Group and what they post.
Private Groups tend to have better community and engagement, as there are many people on Facebook that do not want their friends and family to see their comments made in a Public Group.
6. Choose whether Group is hidden or not
Visible Groups means anyone can find the Group.
Hidden Groups means only members can find the Group, and people can only join via invitation.
If you want to grow a large Facebook Group, it is recommended to choose Visible.
7. Click Create Group
8. Choose cover photo
You can upload a photo, or choose a template illustration.
9. Add a description
Add more information about your Group here. Who is your Group for? What is the purpose of your Group? If you have any Group rules, you can add it here as well.
10. Edit Group settings
Once in the Group settings, you will have the option to customize many settings to your liking.
Items you can change:
Group Name
Group Type
Description
Location – This can help people find your group more easily if they’re looking for groups in your area.
Tags – Tags help people find groups they might be interested in joining. You can change these at any time.
Apps – Tools and features offered by other businesses.
Linked Pages – Give your business, brand or organization a voice on Facebook and connect with the right people.
Color
Web Address – Customize your group’s contact info so you can quickly share a link to your group.
Privacy Settings
Hide Group
Badges – Enable members to earn badges to encourage participation.
Post Topics – Organize posts by adding relevant topics to them
Membership Preapprovals — Do you want to let anyone add members or should only you be able to?
Membership Requests – Learn more about people who want to join your group by asking them some questions. You can ask up to 3 questions, and only the admins and moderators will see the answers.
Membership Requests from Pages
Posting Permissions — Here you can decide if only admins can post or if members can as well
Post Approval — You can require that all posts be approved by an admin before going live
Keyword Alerts – Keyword alerts tell you when members use certain words or phrases in your group.
Once you’re done, click “Save”.
11. Add members
Now your Group needs some members. Add some friends you think might be interested in joining your Group.
12. Create community and encourage engagement
All good Facebook Groups require an Admin that adds value to the Group and starts good discussions. Stay active in the Group and post frequently as the Group is growing.
Facebook likes to promote active Groups, so if you want more people to find your Group, create a new post at least a few times a week.
Best of luck to you as you create your Facebook Group!
Want to add your Facebook Page as an Admin of your Facebook Group?
Reddit is full of subreddits. Some subreddits are great, some subreddits are terrible. Here is a list to help you find the top 17 best subreddits on Reddit.
In no particular order, here are some of the top subreddits on Reddit: