
It's surprisingly easy to click the "Create Group" button on Facebook. You can have a group up and running in minutes. The real challenge, though, isn't the setup—it's building a foundation that actually makes people want to join and stick around.
Without a solid plan, you risk creating just another empty digital room. Getting the strategy right from the start is what separates a thriving community from a ghost town.
Laying the Foundation for a Successful Group
Before you even think about a group name or a cover photo, you need a strategy. A great Facebook group is a destination, not just a space. Taking the time to make a few key decisions upfront will pay off big time.
And the potential is huge. Facebook Groups are a massive part of the platform, with around 1.8 billion users diving into them every single month. They've been around since 2010, and they've only gotten more important for connecting people. If you want to dig deeper into the numbers, Hootsuite's 2024 report has some fascinating insights.
Define Your Group’s Core Mission
Every successful community I've ever seen was built on a crystal-clear mission. The most important question to ask yourself is: Why should someone join this group?
Your answer is the mission. It’s the guiding star for every post, rule, and decision you’ll make. A weak mission leads to a confused audience and, you guessed it, zero engagement.
A strong mission statement does a few things really well:
- It sets clear expectations. Members know exactly what they’re signing up for.
- It attracts the right people. A specific mission naturally filters out those who aren't a good fit.
- It guides your content strategy. You'll never run out of ideas because you know what purpose your content needs to serve.
For example, a mission like "A group for marketers" is forgettable. But something like, "A community for B2B SaaS marketers to share non-obvious growth tactics and get expert feedback"—now that’s specific, valuable, and magnetic.
Choose the Right Privacy Setting
This is one of the most critical choices you'll make, as it directly controls who can find your group and see its content. There’s no "best" option here; it all comes down to your goals.
Are you trying to maximize reach for your brand? A Public group might be perfect. Or are you building an exclusive community for a paid course? A Hidden group is the way to go. This simple decision tree can help you visualize the best path for your goals.
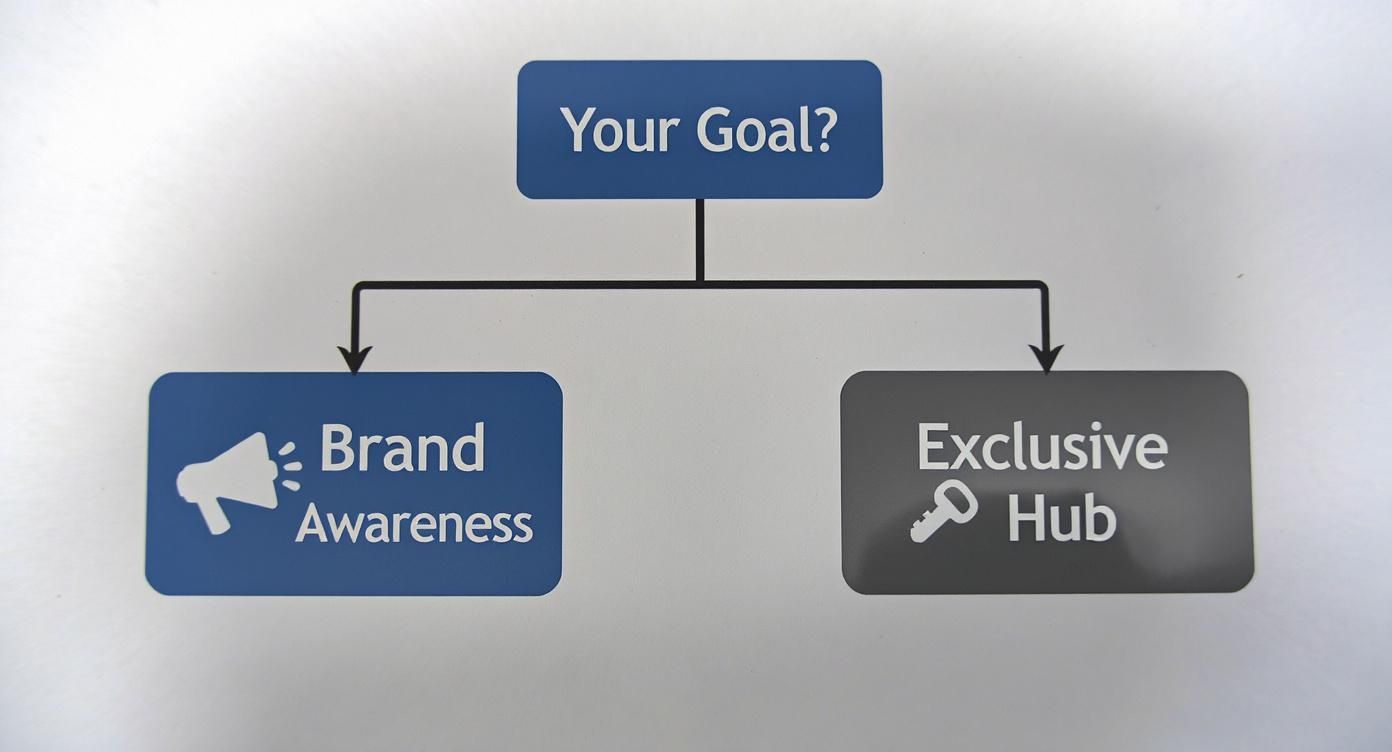
Public groups are like a megaphone, broadcasting your message far and wide. Private groups, on the other hand, are like a locked room where you control the guest list.
To make it even clearer, here’s a breakdown of the three privacy settings and what they're best suited for.
Choosing Your Facebook Group Privacy Setting
| Setting | Visibility and Discoverability | Content Privacy | Best For |
|---|---|---|---|
| Public | Anyone can find the group, see its members, and view all posts without joining. | All content is visible to anyone on or off Facebook. | Maximum brand awareness, open forums, fan clubs, and public announcements. |
| Private | Anyone can find the group in search, but only members can see who is in it and what's posted. | Content is visible only to members. | Niche communities, support groups, customer-only hubs, and topic-specific discussions. |
| Hidden | The group is unlisted and cannot be found via search. New members must be invited directly. | Content is completely hidden from non-members. | Paid masterminds, exclusive coaching groups, internal teams, or highly sensitive communities. |
Ultimately, your choice here shapes the entire vibe and purpose of your community from day one.
Pro Tip: You can change a Private group to Public, but you can only change a Public group to Private once. Facebook gives you a 24-hour window to change it back, but after that, the decision is permanent. I highly recommend thinking this through carefully before you launch.
Naming and Describing Your Group
Your group's name and description are your digital handshake. They’re the first things potential members see.
The name needs to be clear, easy to remember, and—most importantly—searchable. Try to include keywords your ideal member would actually type into the search bar. "Canva for Course Creators" is way more effective than something generic like "Jenna's Design Circle."
Think of the description as your sales pitch. It needs to grab attention and spell out exactly why someone should hit that "Join" button.
A great description should:
- Hook the reader with the group's main purpose.
- Clearly state who the group is for.
- List the tangible benefits of joining (e.g., weekly expert Q&As, networking threads, free templates).
- Briefly mention any key rules or expectations.
Getting this foundational work done right—mission, privacy, name, and description—is the most important thing you can do to build a Facebook group that doesn't just launch, but truly thrives.
Your First Steps to Launch and Optimize
You've nailed down your group's mission and privacy settings—now it's time to bring it to life. This is where we get into the details, the small optimizations that make a huge difference in how professional and welcoming your group feels to new members. Getting these things right from the jump sets the stage for a well-run, engaging community.
The very first thing anyone sees is your cover photo. It’s your group’s billboard, and it needs to instantly tell people what you're all about. A generic or blurry image just screams "amateur hour."
Instead, create a custom graphic that’s both sharp and informative. The sweet spot for a Facebook group cover photo is 1640 x 856 pixels. Use that real estate to display your group name, a quick tagline explaining your purpose, and your brand colors.
Craft Smart Membership Questions
Think of membership questions as your front-door bouncer and your best market research tool, all in one. You get to ask up to three of them, and using them wisely is a total game-changer for weeding out spammers and understanding your audience.
Go beyond a basic "Will you follow the rules?" Your real goal here is to screen for quality members while learning exactly what they need from you.
Here are a few question types I’ve found to be incredibly effective:
- The Problem Solver: "What's the #1 challenge you're facing with [your group's topic] right now?" This question is pure gold. It gives you a direct pipeline into your members' biggest struggles, which is perfect fuel for your content strategy.
- The Experience Check: "On a scale of 1-5, how would you rate your expertise in [your group's topic]?" This helps you get a feel for the room. Are you dealing with beginners or seasoned pros? The answer helps you tailor your content so it actually lands.
- The Email Opt-In: "Want our weekly newsletter with exclusive tips? If so, drop your email below." This is a fantastic, totally consent-based way to grow your email list directly from your group's front door.
These questions turn the approval process from a simple chore into a powerful data-gathering machine before a member even sets foot inside.
Establish a Welcoming Atmosphere
Okay, so they're approved. What happens next is critical. A pinned welcome post is the absolute best way to greet new members, set expectations, and show them how to get the most out of the community.
This post should live permanently at the top of your group feed. It’s the orientation for newcomers and a constant cultural touchstone for everyone else.
A killer welcome post usually includes:
- A warm, genuinely enthusiastic greeting.
- A quick reminder of the group's mission.
- A direct link to the full group rules.
- A call-to-action, like asking members to introduce themselves in the comments.
This one simple step makes your group feel organized and thoughtfully managed from the second someone joins.
Creating a structured and positive environment from day one is non-negotiable. Well-defined rules and a clear onboarding process prevent future moderation headaches and encourage the kind of high-quality participation you want to see.
To add another layer of polish, make sure to link your group to your official Facebook Business Page. It's a small tweak, but it adds a lot of credibility and helps people who follow your page discover your community.
Finally, start organizing your content from the get-go with post topics (what Facebook used to call tags). Create topics for recurring themes like "Weekly Wins," "Q&A," or "Member Spotlights." This makes it incredibly easy for members to find relevant content and browse past conversations, which dramatically improves the user experience as your group grows.
Crafting a Content Plan That Drives Engagement
An active group is a growing group. Simple as that. Once you have the basic structure down, your next job is to fill it with stuff that gets people talking and makes them feel like they've found their online home. A solid content plan is the key to turning a quiet group into a buzzing community.
This isn't just about throwing posts at the wall to see what sticks. Facebook Groups are powerful because they generate way more active participation than most other parts of the platform. People genuinely spend more time in groups than they do scrolling their News Feed, which tells you everything you need to know about where their attention is.
Building Your Content Pillars
Instead of winging it every day, think in terms of content "pillars" or recurring themes. These give your group a rhythm that members can actually look forward to. It's how you keep things fresh while still being predictable in a good way.
Here are a few tried-and-true content types that work in almost any niche:
- Weekly Themed Posts: This is a classic for a reason. Think "Mindset Monday," "Tool Tuesday," "Wins Wednesday," or "Feedback Friday." It gives members a clear, low-stakes way to jump into the conversation.
- Discussion Prompts: Go beyond simple yes/no questions. Ask open-ended questions that encourage storytelling or opinions. Something like, "What's one myth about [your topic] you'd love to bust?" gets people thinking and sharing.
- Member Spotlights: Make your members the heroes of the community. Regularly featuring a member's story, success, or project makes that person feel seen and inspires everyone else. It's a huge win for building bonds.
Live video is another fantastic tool for creating that real-time connection. Running live Q&As, tutorials, or casual "behind-the-scenes" sessions can make your group feel incredibly personal and immediate. If you're new to it, there's a lot to learn about how to effectively live stream on Facebook.
Balancing Value, Community, and Promotion
It's easy to fall into the trap of making every post about your business. But that's a surefire way to kill engagement. The golden rule is simple: give, give, give, then ask. Your main job is to provide value and foster relationships.
A healthy content mix should look something like this:
- Value Posts (60%): This is your bread and butter. Educational content, quick tips, helpful resources, and expert advice that solves your members' problems.
- Community Posts (30%): These are all about getting people to talk to each other. Think discussion prompts, member spotlights, and fun, off-topic threads.
- Promotional Posts (10%): When you've earned enough trust, posts about your products or services will feel like a natural extension of the value you provide, not a sales pitch.
A well-planned content calendar is your secret weapon for consistency. It takes away the daily stress of "what should I post?" and keeps the group humming with activity—a huge signal to the Facebook algorithm that your group is worth showing to more people.
Planning Ahead Without the Burnout
Staying consistent doesn't mean you have to be glued to your screen 24/7. This is where a little planning and smart automation save the day. Even a simple spreadsheet can work as a content calendar, letting you map out your weekly themes and post ideas for the whole month.
And for those days when you're just not feeling creative? Tools can fill in the gaps. We even have a guide on using a Facebook post generator to help spark some ideas and get you unstuck.
The real goal is to build a system that works for you. Try batching your content creation—set aside a couple of hours one day to plan and write all your posts for the next week or two. This frees you up to do the important stuff: replying to comments, welcoming new folks, and actually participating in the community you've built.
Automating Your Content with OneUp
Consistent content is the lifeblood of any good Facebook Group. But let's be real—as your community grows, the daily grind of posting, planning, and scheduling can turn into a full-time job. This is where burnout happens and engagement starts to tank.
Smart automation isn't about setting it and forgetting it. It’s about working smarter so you can focus on what a machine can't do: building real connections, sparking conversations, and actually moderating your community.
This is exactly where a tool like OneUp becomes an absolute game-changer. It helps you shift from manually pushing out every single post to building a content engine that runs smoothly in the background, freeing you up to be the community leader you need to be.
Schedule and Forget Your Evergreen Content
Every group has those foundational, must-see posts. Think about your weekly "Introduce Yourself" thread, a reminder of the group rules, or a popular tip that new members always find helpful. Manually posting these every single week is not only tedious, but it's also incredibly easy to forget when you get busy.
OneUp solves this headache with its repeating post feature. You can set up a post one time and have it automatically republish at whatever interval makes sense—every week, every two weeks, you name it. This keeps your core content in constant circulation, making sure both new and old members see it. You can even set posts to repeat every few hours, daily, weekly, monthly, or yearly, giving you total control.
Just imagine setting up your "Welcome Wednesday" post once and having it go out every single week without you lifting a finger. That feature alone can claw back hours of your time each month and give your group a predictable, welcoming rhythm.
Master Your Content Workflow
Running one group is tough enough. But if you’re juggling multiple groups or trying to post content across different social media platforms, things get complicated, fast. OneUp was built for this exact problem.
You can schedule a single post to go out to multiple Facebook Groups, Pages, and other social accounts all at once. Even better, you can customize the caption for each platform right from the post composer. That means you can keep the tone conversational for your group while using a more professional voice on LinkedIn, all without leaving the screen.
OneUp’s bulk scheduling is a massive time-saver for long-term planning. You can prep months of content in a simple CSV file, upload it in minutes, and have a deep queue of posts ready to go. This is perfect for batching your content creation.
OneUp Features for Facebook Group Management
To really get a feel for how a dedicated tool can make your life easier, let's break down some common admin headaches and how a platform like OneUp tackles them head-on.
| Common Challenge | OneUp Feature | How It Helps You |
|---|---|---|
| Forgetting to post weekly threads | Repeating Posts | Set your recurring posts (like welcome threads or rule reminders) once and have them automatically publish at your chosen interval, from hourly to yearly. |
| Manually cross-posting content | Multi-Platform Scheduling | Post to Facebook Groups, Pages, X (Twitter), LinkedIn, Pinterest, and more from a single screen, with customized captions for each. |
| Long-term content planning is a mess | Bulk CSV Upload | Prepare and upload hundreds of posts at once from a spreadsheet, saving you countless hours of manual scheduling. |
| Links in captions hurt post reach | First Comment CTA | Automatically add your call-to-action link as the first comment, keeping your post clean and potentially boosting its visibility. |
| Creating visuals takes too long | Canva & Media Integrations | Design graphics directly inside OneUp with Canva, or pull in GIFs and stock photos from Giphy and Unsplash on the fly. |
Ultimately, these features are designed to handle the repetitive parts of the job so you can pour your energy back into what matters most: your members.
Boost Engagement with Smart Features
Beyond the scheduling basics, OneUp offers a few clever features designed to make every post work harder for you. For example, you can automatically add a call-to-action link in the first comment. This is a popular tactic for a reason: it keeps your main caption clean and distraction-free while still driving traffic to your blog or website.
And let's not forget visuals. Creating eye-catching content is built right into the workflow:
- Canva Integration: Design professional-looking graphics right inside the OneUp dashboard. No more switching between tabs.
- Giphy and Unsplash: Need a quick GIF or a high-quality stock photo? You can search and add them to your post in seconds.
- Custom Thumbnails: Upload a custom thumbnail for your videos to make sure they look polished and on-brand in the feed.
- Auto-Post from RSS Feeds: Connect your favorite blogs or news sites and have OneUp automatically share new articles directly to your group, keeping it fresh with relevant content.
By taking the friction out of content creation and automating the repetitive tasks, you get your most valuable resource back: your time. And investing that time back into genuine community interaction is the real key to building a group that's not just big, but active and loyal.
Fostering a Thriving and Active Community
Automating your posts keeps the content flowing, but that’s only half the battle. The real secret to turning a list of members into a genuine, self-sustaining community? Human connection. This is where you, the community manager, come in.
Your primary goal is to create a safe, supportive space where people want to post, comment, and connect. When that happens, Facebook's algorithm takes notice, seeing your group as valuable and worth showing to more people.
Getting Members Talking to Each Other
If every single conversation starts and ends with an admin, your group feels more like a one-way announcement channel. The magic really happens when members start conversations on their own. Your job is to light the spark.
Daily or weekly themed prompts are a fantastic way to do this. They give people a simple, low-pressure way to jump in and share.
- Share Your Wins Wednesday: Get people posting about a recent success, no matter how small. This fosters a really positive and encouraging atmosphere.
- Feedback Friday: Set up a thread where members can get opinions on a project, an idea, or a challenge they're stuck on.
- Struggle Sunday: Create a safe space for vulnerability. Let members share what's tough, opening the door for others to chime in with support and advice.
Another simple but powerful tactic is to recognize your top contributors. Facebook’s own analytics point you straight to your most active members. A quick public shout-out or a "Member of the Week" feature makes people feel seen and appreciated, which almost always encourages them (and others) to participate even more.
Handling Moderation With Grace
As your group grows, you'll inevitably deal with spam, arguments, and people bending the rules. The way you handle these moments is what truly defines your group's culture. The key is to be fair, consistent, and totally transparent.
When you have to remove a post, don't just zap it into oblivion. Send the member a polite PM explaining exactly which rule they broke. This is way more effective than a silent takedown and helps them learn for next time. If a conflict breaks out, step in publicly with a calm reminder of the rules, then take it to private messages if things don't cool down.
Fair and consistent rule enforcement is the bedrock of a safe community. When members trust that you will act predictably to protect the space, they feel more comfortable opening up and engaging authentically.
Looking for another way to energize your group? Consider adding some fun and healthy competition by implementing proven gamification strategies for community engagement.
Scaling Your Moderation Team
Let's be real: at some point, you won't be able to do it all yourself. Trying to is a one-way ticket to burnout. That's your cue to build a moderation team.
Start by looking for members who are already active, helpful, and embody the kind of behavior you want to see. Reach out and ask them to help.
Remember, you're not just creating a Facebook group; you're building a space that offers real value. From a business standpoint, this kind of organic interaction builds an incredible amount of brand trust. And that trust pays off. Projections show that by 2025, Facebook is expected to convert 38.5% of its U.S. users into buyers—a massive testament to the platform's power in building relationships that drive sales. Nurturing that trust through your community is step one.
Burning Questions About Managing Facebook Groups
Even with the best game plan, things will inevitably pop up as you get the hang of running a Facebook Group. Here are some clear, no-nonsense answers to the questions we see admins asking all the time.
Can I Schedule Posts to a Group I Don’t Own?
Nope. For security reasons, Facebook requires you to be a full Admin of a Group to connect it to a third-party scheduler like OneUp. This is a good thing—it stops unauthorized people from posting to your community.
If you’re just a moderator or editor, you won’t have the right permissions to link the group to an automation tool. The group's owner will need to bump up your role to Admin before you can start scheduling content.
What's the Real Difference Between a Facebook Group and a Page?
Think of it this way: a Page is a billboard, but a Group is a clubhouse.
- A Facebook Page is the official, public-facing profile for a business or brand. It's built for broadcasting information one-way, from you to your audience.
- A Facebook Group is all about community. It’s a dedicated space for two-way conversations and interactions between members who are all interested in the same thing.
Pages are for your official announcements and brand presence. Groups are where you build a real community, spark conversations, and foster genuine engagement.
How Often Should I Be Posting in My Group?
There's no magic number here. The truth is, consistency is way more important than frequency.
A good place to start is with one or two high-quality, engaging posts per day. It’s much more effective to share one really thoughtful discussion starter that gets people talking than it is to spam the group with five low-effort posts that nobody interacts with.
The best way to figure this out is to dive into your Facebook Group Insights. That data tells you exactly when your members are online and what kind of content gets the most love. Use it to build a posting schedule that actually works for your audience.
What Are the Best Ways to Grow My Facebook Group?
Growing a group is a marathon, not a sprint. It's a mix of smart promotion and, most importantly, creating a space that people actually want to join.
Here are a few strategies that flat-out work:
- Cross-Promote Everywhere: Don't be shy. Mention your group in your email newsletter, on your website, and across all your other social media profiles.
- Encourage Member Invites: Make it fun! Run a little contest or a challenge that gives members a reason to invite friends who would be a perfect fit for the community.
- Team Up with Other Admins: Find another group admin in a similar niche and agree to give each other a shout-out. It’s a win-win.
- Create Killer Content: This is the big one. If your content is consistently valuable, helpful, or entertaining, your group will become a must-join destination. Word of mouth will become your most powerful growth engine.
Can I Edit a Scheduled Post in OneUp?
Yes, you absolutely can. That's one of the best parts of using a tool like OneUp—you have total control over your content calendar.
You can easily hop in and edit, reschedule, or even delete any of your scheduled posts right from the calendar or queue view. That means you can quickly update time-sensitive info, fix a last-minute typo, or shift your strategy without having to scrap the post and start over. All of OneUp's plans, which you can see in their pricing information, offer this kind of flexibility. It’s all about making sure your content is perfect before it goes live.